All Resources

Conductivity Tester

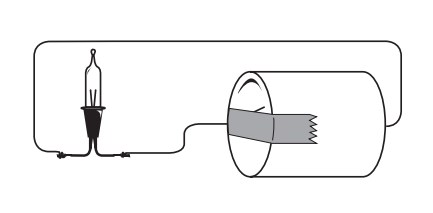
Current electricity needs a completed circuit for electrons to flow continuously.

In this activity, students will make a broken circuit. They will then use the loose wire ends to test the conductivity of various materials.

When a conductor is placed between these loose wire ends, the circuit is completed and the light goes on. When an insulator is placed between the ends, the circuit is still broken, because electrons cannot flow through insulators, and the light stays off. Objects that are made of metal are all conductors to some degree.

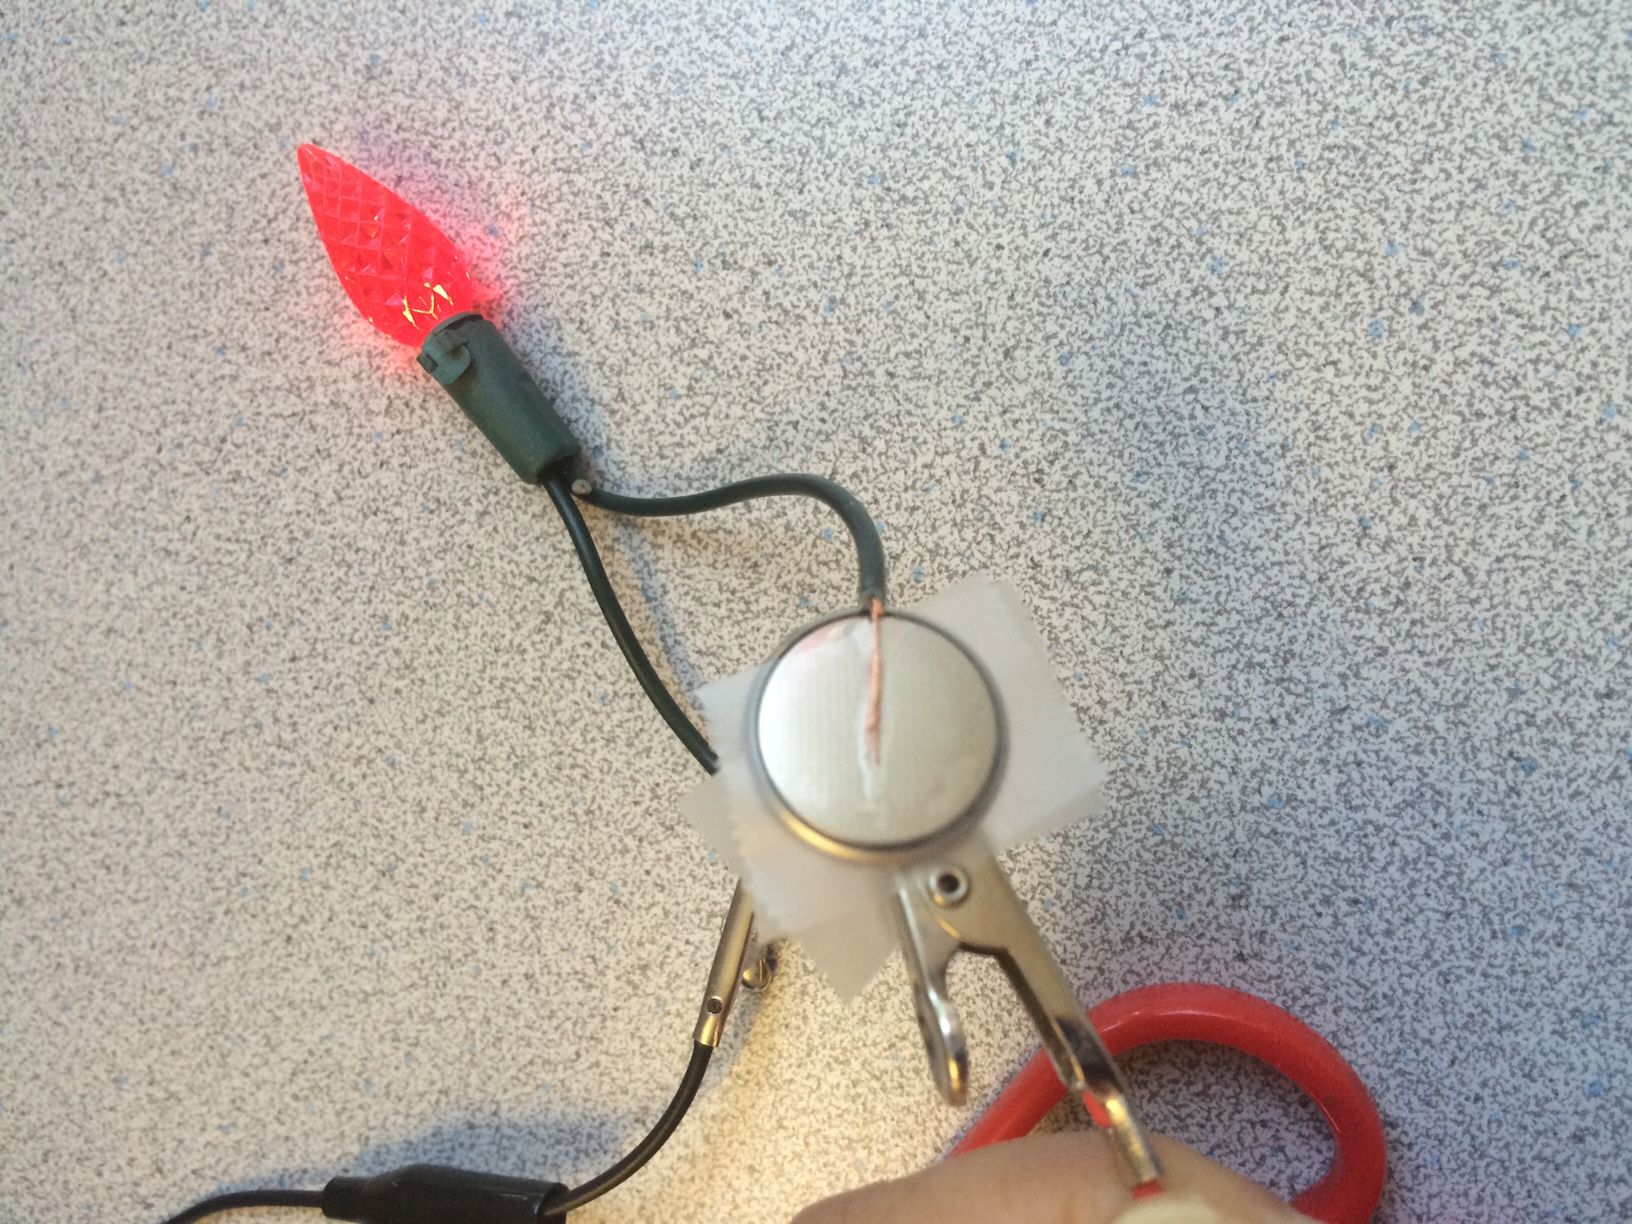
The longer the path that the electric current must take through a conductor, the greater the resistance. Pencil 'lead' (graphite) conducts electric current but provides lots of resistance.

The effect of changing the length of the path the current takes through graphite can be seen by watching the brightness of the bulb.

Objectives

  • Describe the components required to complete an electric circuit.

Materials

  • Per Class:
    wire cutters
    wire strippers
    a variety of testing materials, e.g. a penny, dime, nickel, quarter, aluminum foil, paper, wood, glass, cloth, ruler, pencil ”lead”, eraser, etc.

  • Per student:
    3V D-cell OR coin battery, (size 2032 or CR1220)
    tape
    2 Christmas tree mini-light bulb with wires attached
    3 cm length of insulated wire
    10 cm length of insulated wire

Key Questions

  • How do you know if a material conducts electric current?
  • If you are testing a material and the light does not go on, what does that mean?
  • Which materials are conductors? Which materials are insulators?
  • Which would you consider a “semiconductor”? What does a “semiconductor” mean?
  • Can you complete the circuit by joining together several different materials?

What To Do

Preparation:

  1. Cut enough lengths of insulated wire for the class.
  2. Strip both ends of every wire, including the wires attached to the bulb.

Part 1: Making the tester

  1. Attach the first and second wires to each of the wires of the bulb.
  2. Tape the free end of one of the wires to the positive end of the battery.
  3. Tape one end of the third wire to the negative end of the second battery.
  4. The two loose ends are the test terminals.
  5. Test your conductivity tester by touching the two loose wire ends together. The light bulb should come on.
      

Part 2: Making the tester

  1. Write the names of the testing materials on the board and ask students to predict which ones are conductors and which ones are insulators.
  2. Test some of the provided materials for conductivity by placing them between the two loose terminals.
  3. Observe the light bulb and record what happens.

Testing Scissors:

​Teacher Tip: Instead of batteries as testers, you can use “UFO/circuit balls.” Circuit balls are a good substitute because they demonstrate how humans are good conductors too.

Extensions

  • Replace the bulb with an ammeter and record the conductivity results for all the different materials. List the materials in order of conductivity.
  • Go on a conductivity “scavenger hunt” around the school to find and record conductors and insulators.
  • Make "Squishy Circuits", an electrifying resource from the Thomas Lab at the University of St. Thomas.

About the sticker

Survivors

Artist: Jeff Kulak

Jeff is a senior graphic designer at Science World. His illustration work has been published in the Walrus, The National Post, Reader’s Digest and Chickadee Magazine. He loves to make music, ride bikes, and spend time in the forest.

About the sticker

Egg BB

Artist: Jeff Kulak

Jeff is a senior graphic designer at Science World. His illustration work has been published in the Walrus, The National Post, Reader’s Digest and Chickadee Magazine. He loves to make music, ride bikes, and spend time in the forest.

About the sticker

Comet Crisp

Artist: Jeff Kulak

Jeff is a senior graphic designer at Science World. His illustration work has been published in the Walrus, The National Post, Reader’s Digest and Chickadee Magazine. He loves to make music, ride bikes, and spend time in the forest.

About the sticker

T-Rex and Baby

Artist: Michelle Yong

Michelle is a designer with a focus on creating joyful digital experiences! She enjoys exploring the potential forms that an idea can express itself in and helping then take shape.

About the sticker

Buddy the T-Rex

Artist: Michelle Yong

Michelle is a designer with a focus on creating joyful digital experiences! She enjoys exploring the potential forms that an idea can express itself in and helping then take shape.

About the sticker

Geodessy

Artist: Michelle Yong

Michelle is a designer with a focus on creating joyful digital experiences! She enjoys exploring the potential forms that an idea can express itself in and helping then take shape.

About the sticker

Science Buddies

Artist: Ty Dale

From Canada, Ty was born in Vancouver, British Columbia in 1993. From his chaotic workspace he draws in several different illustrative styles with thick outlines, bold colours and quirky-child like drawings. Ty distils the world around him into its basic geometry, prompting us to look at the mundane in a different way.

About the sticker

Western Dinosaur

Artist: Ty Dale

From Canada, Ty was born in Vancouver, British Columbia in 1993. From his chaotic workspace he draws in several different illustrative styles with thick outlines, bold colours and quirky-child like drawings. Ty distils the world around him into its basic geometry, prompting us to look at the mundane in a different way.

About the sticker

Time-Travel T-Rex

Artist: Ty Dale

From Canada, Ty was born in Vancouver, British Columbia in 1993. From his chaotic workspace he draws in several different illustrative styles with thick outlines, bold colours and quirky-child like drawings. Ty distils the world around him into its basic geometry, prompting us to look at the mundane in a different way.