All Resources

Squishy Circuits

The materials in this activity encourage students to build and explore the basic principles of electric circuits.

circuit is a continuous path through which electricity travels. A complete electric circuit is an uninterrupted path for electrons to flow from an energy source (i.e. battery or household power), through a device and back to the source. If we break that path, the flow of electrons stops, and we no longer get energy from our circuit, and the device (in this case, light bulbs) no longer has power. 

  • In a parallel circuit, all loads are connected in parallel to one another, forming junction points where the current can split and combine.
  • In a series circuit, all loads, like light bulbs, are connected end-to-end, forming a single path for the current to flow.

Parallel Circuit (top)

Series Circuit (bottom)

Resistance is a measure of the opposition to current flow in an electrical circuit, and is measured in ohms, symbolized by the Greek letter omega (Ω). All materials resist current flow to some degree. They fall into one of two broad categories:

  • Conductors: Materials that offer very little resistance where electrons can move easily. Examples: silver, copper, gold and aluminum.
  • Insulators: Materials that present high resistance and restrict the flow of electrons. Examples: Rubber, paper, glass, wood and plastic.

Objectives

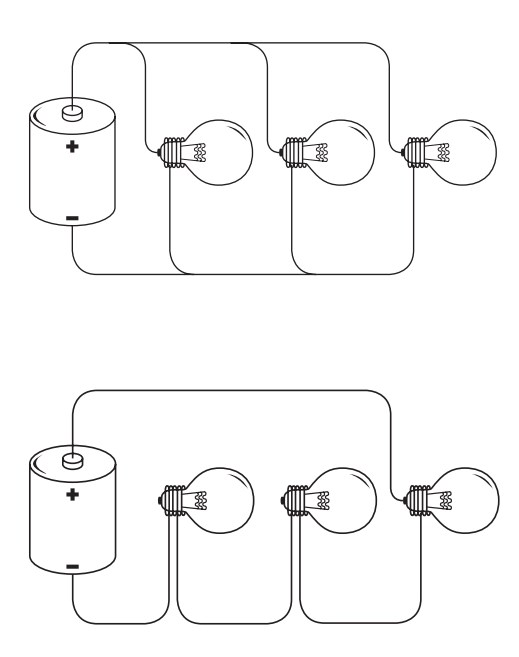
  • Build a series and parallel circuit

  • Explain that a bulb will only light up when a circuit is complete

  • Troubleshoot to prevent short circuits

Materials

  • For each Group of 2-3 Students:
    9V battery
    9V battery clip
    A handful of conducting play dough
    3 or 4 10 mm LEDs or string of LED holiday lights
    5 or 6 conductive and insulating items (pens, wooden sticks, cutlery, keys, aluminum foil)


    Conducting Playdough Ingredients:
    250 mL water
    375 mL flour
    70 mL salt
    130 mL lemon juice
    15 mL vegetable oil
    food colouring (optional)

Key Questions

  • Does the circuit work if you turn the LED around? (The LED works only when the current flows in one particular direction. Try turning the LED and/or swapping the positive and negative leads from the battery to test this.)

What To Do

Teacher Tip:

Holiday lights are more durable in the hands of students, although not much cheaper than the 10 mm LEDs. Use wire cutters to cut apart the individual lights, each with two wire “tails” at least 2 cm long. Then strip the ends of the wires to expose the copper.  Put solder or a ferrule on the exposed end of the wire to help keep it from fraying.

Prepare conducting play dough:  

This recipe was developed by AnnMarie Thomas of University of St. Thomas in St. Paul, Minnesota | SquishyCircuits

Ingredients

250 mL water
375 mL flour
70 mL salt
130 mL lemon juice
15 mL vegetable oil
food colouring (optional)

     Procedure

  1. Mix water, 250mL of flour, salt, lemon juice, oil and food colouring in a medium sized pot.
  2. Cook over medium heat and stir continuously. The mixture will begin to boil and get lumpy.
  3. Continue stirring until the dough forms a ball in the centre of the pot.
  4. Let the ball cool a bit, then turn it out onto a floured surface.
  5. Knead in the remaining flour

Store the playdough in an airtight container or a plastic bag.  It will keep for 2-3 weeks. One batch makes enough for 24-30 students working in groups of 3.

SAFETY:

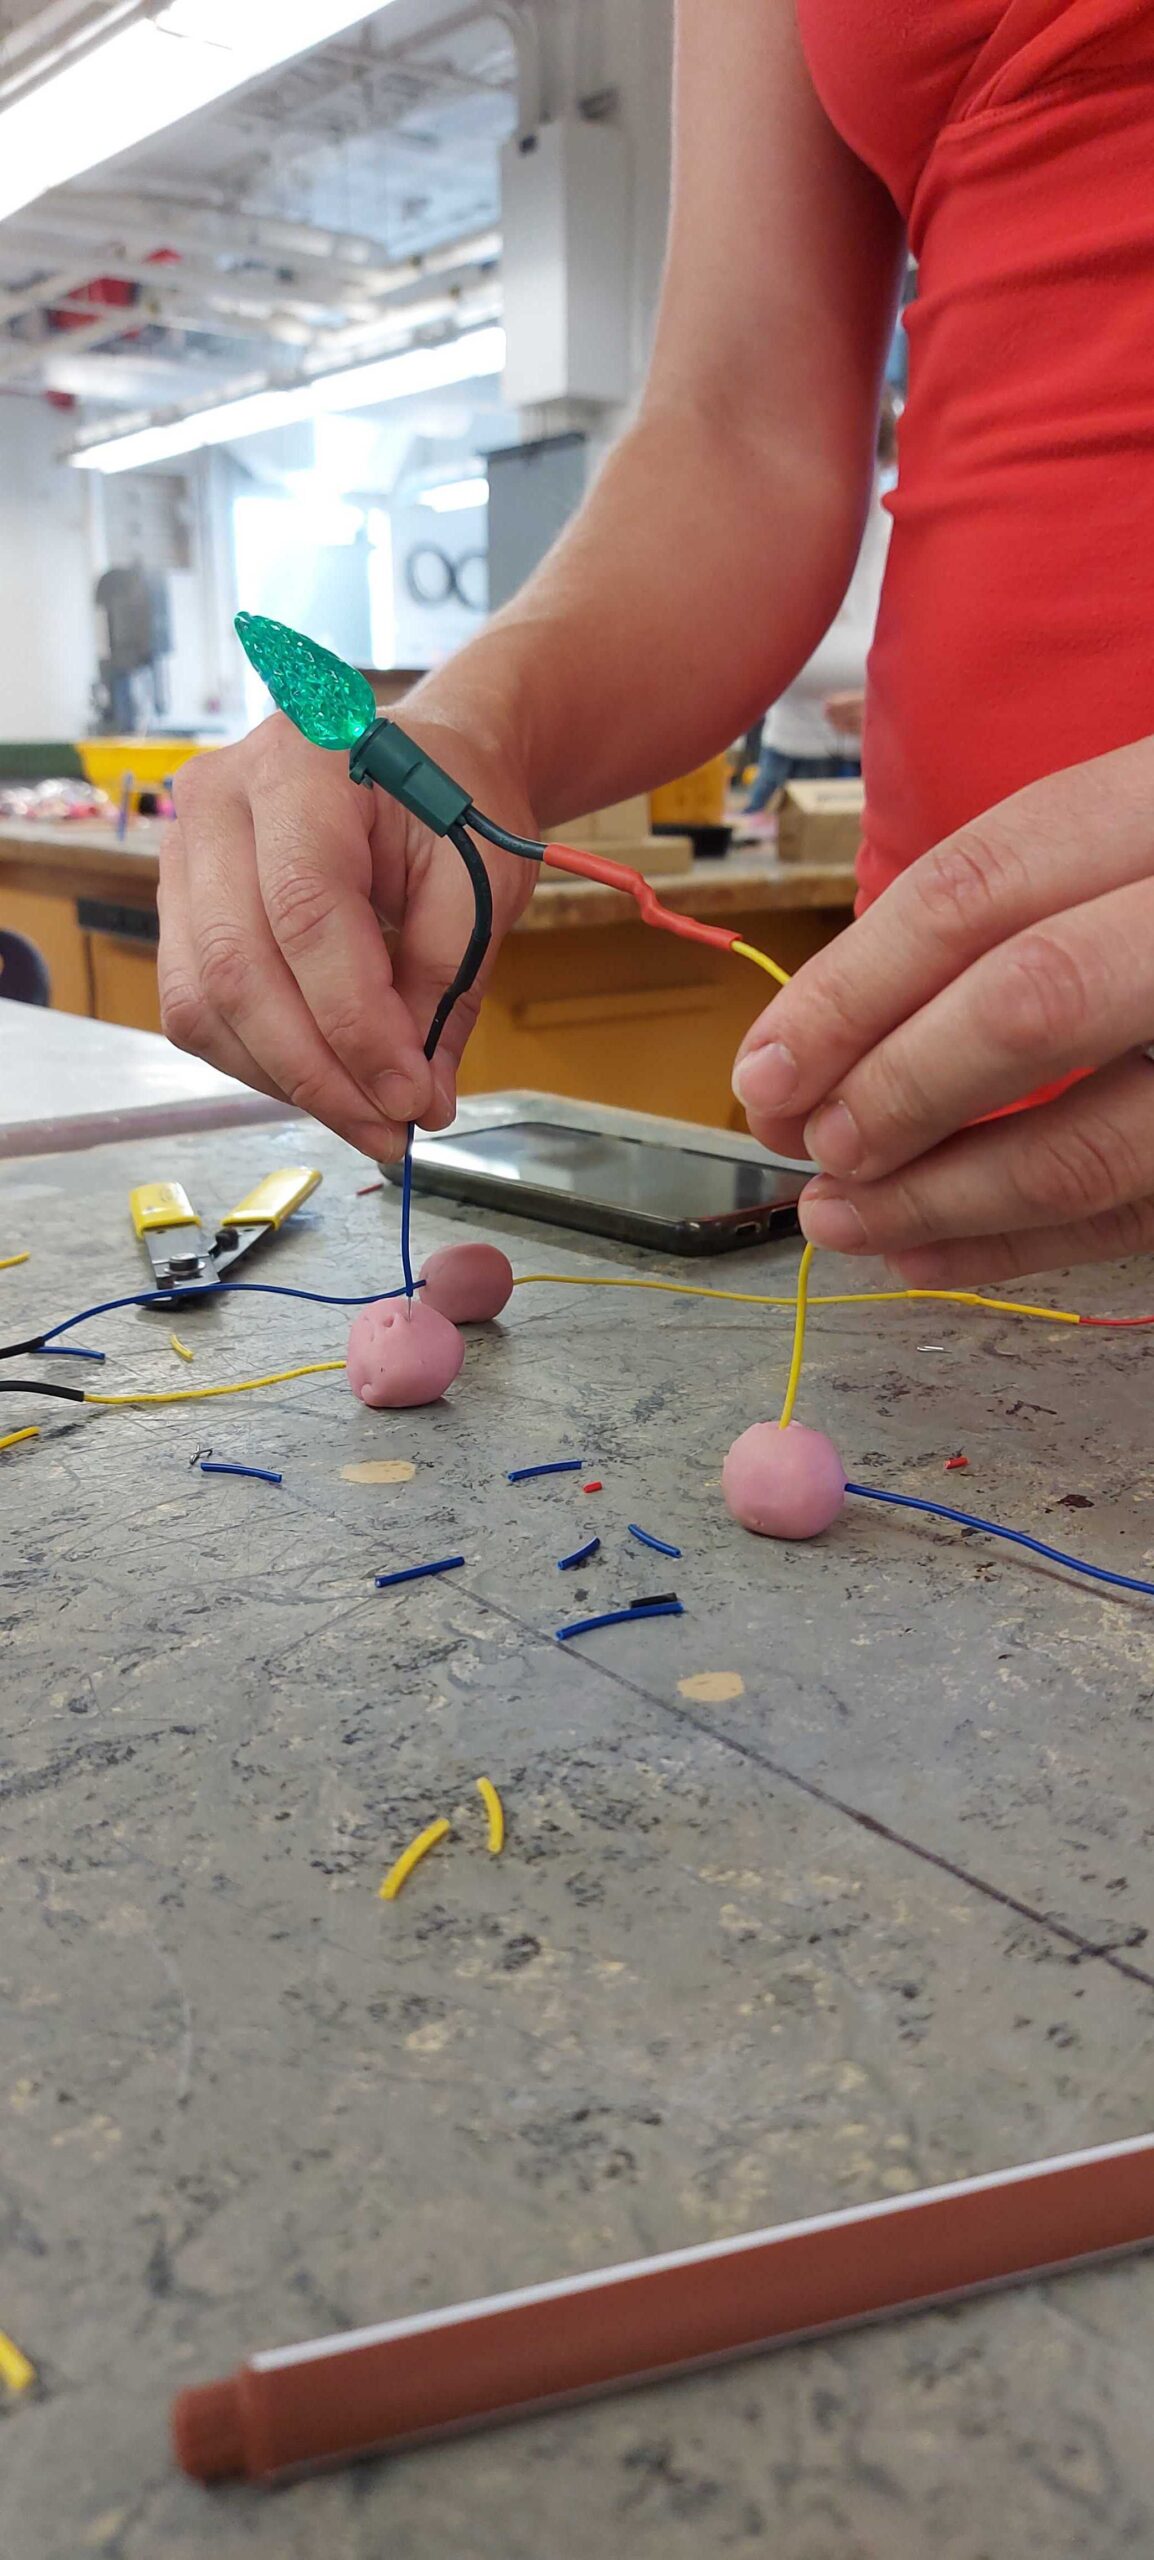
If an LED bulb is connected directly (no play dough) to the battery, the bulb will stop working.  Always make sure there is playdough in the circuit. A short-circuit may cause the wires or battery to become hot to the touch.  Disconnect the battery clips after the activity to avoid accidental short-circuiting in storage.

TEACHER TIP: LEDs are directional; they create light only when current flows through them in one direction.  It’s also worth knowing that too much voltage will destroy the LED.  The energy that passes through an LED is usually regulated by adding resistance to the circuit, which is why we make sure that playdough is always part of a squishy circuit.

Activity:

  1. Organize students into pairs or groups of 3.  Each group gets a handful of play dough, a battery with a clip, and one LED light bulb.
  2. Challenge the students to light the bulb without touching any metal part to any other metal part.  They should only use play dough to make the electrical connection.
  3. As each group is successful, invite them to take on further challenges, for example:
    1. Light two or three bulbs.
    2. Create a playdough switch that will turn the bulbs on and off.
    3. Create a switch that will turn off one of two lights (but not the other).
    4. Create a parallel circuit with two bulbs.
    5. Create a series circuit with two bulbs.
  4. Optional: Introduce other items into the circuit to find out whether they conduct current.  Good choices are wooden sticks, pieces of aluminum foil, keys, pens and pencils, etc.

Extensions

  • Does (a pencil, a key, a piece of foil) conduct current? How do you know? (The item is a conductor if the bulb lights with the item as part of the circuit.)

Other Resources

BC Hydro | Exploring Simple Circuits

BC Hydro | Exploring Series and Parallel Circuits

How Stuff Works | How Light Emitting Diodes Work

About the sticker

Survivors

Artist: Jeff Kulak

Jeff is a senior graphic designer at Science World. His illustration work has been published in the Walrus, The National Post, Reader’s Digest and Chickadee Magazine. He loves to make music, ride bikes, and spend time in the forest.

About the sticker

Egg BB

Artist: Jeff Kulak

Jeff is a senior graphic designer at Science World. His illustration work has been published in the Walrus, The National Post, Reader’s Digest and Chickadee Magazine. He loves to make music, ride bikes, and spend time in the forest.

About the sticker

Comet Crisp

Artist: Jeff Kulak

Jeff is a senior graphic designer at Science World. His illustration work has been published in the Walrus, The National Post, Reader’s Digest and Chickadee Magazine. He loves to make music, ride bikes, and spend time in the forest.

About the sticker

T-Rex and Baby

Artist: Michelle Yong

Michelle is a designer with a focus on creating joyful digital experiences! She enjoys exploring the potential forms that an idea can express itself in and helping then take shape.

About the sticker

Buddy the T-Rex

Artist: Michelle Yong

Michelle is a designer with a focus on creating joyful digital experiences! She enjoys exploring the potential forms that an idea can express itself in and helping then take shape.

About the sticker

Geodessy

Artist: Michelle Yong

Michelle is a designer with a focus on creating joyful digital experiences! She enjoys exploring the potential forms that an idea can express itself in and helping then take shape.

About the sticker

Science Buddies

Artist: Ty Dale

From Canada, Ty was born in Vancouver, British Columbia in 1993. From his chaotic workspace he draws in several different illustrative styles with thick outlines, bold colours and quirky-child like drawings. Ty distils the world around him into its basic geometry, prompting us to look at the mundane in a different way.

About the sticker

Western Dinosaur

Artist: Ty Dale

From Canada, Ty was born in Vancouver, British Columbia in 1993. From his chaotic workspace he draws in several different illustrative styles with thick outlines, bold colours and quirky-child like drawings. Ty distils the world around him into its basic geometry, prompting us to look at the mundane in a different way.

About the sticker

Time-Travel T-Rex

Artist: Ty Dale

From Canada, Ty was born in Vancouver, British Columbia in 1993. From his chaotic workspace he draws in several different illustrative styles with thick outlines, bold colours and quirky-child like drawings. Ty distils the world around him into its basic geometry, prompting us to look at the mundane in a different way.